OpenERP Android Framework Development
Building an OpenERP Mobile module
CRM Lead Module Development
A very basic module structure will be our starting point:
Note
As a sample, we are going to develop mobile app for CRM Lead.
For developing any module you need to add a folder in your addons directory. So, we are creating a folder for crm in addons.
Create two files under crm:
- Lead.java (Android code behind file.)
- LeadDB.java (Used for creating local database table and fetching data from sever)
For creating sync service and module wise sync provider add two folder in crm and add LeadService file into services and LeadProvider into providers:
└── crm
    ├── services
    │   └── LeadService.java
    └── providers
        └── lead
            └── LeadProvider.java
See: Basic directory structure of OpenERP Android framework:
After adding files your directory structure looks like this:
└── addons
    └── crm
        ├── LeadDB.java
        ├── Lead.java
        ├── services
        │   └── LeadService.java
        └── providers
            └── lead
                └── LeadProvider.java
LeadDB.java
In this file, you need to inherit OEDatabase which implements two methods:
- getModelName() - The name of your server model. Here, crm.lead
- getModelColumns() - Returns the list of database table columns
Content of file:
package com.openerp.addons.crm;

import java.util.List;

import android.content.Context;

import com.openerp.orm.OEColumn;
import com.openerp.orm.OEDatabase;

public class LeadDB extends OEDatabase {

        public LeadDB(Context context) {
                super(context);
        }

        @Override
        public String getModelName() {
                return "crm.lead";
        }

        @Override
        public List<OEColumn> getModelColumns() {
                return null;
        }

}
Now we move to add columns in LeadDB.
package com.openerp.addons.crm;

import java.util.ArrayList;
import java.util.List;

import android.content.Context;

import com.openerp.base.res.ResPartnerDB;
import com.openerp.orm.OEColumn;
import com.openerp.orm.OEDatabase;
import com.openerp.orm.OEFields;

public class LeadDB extends OEDatabase {

        Context mContext = null;
        public LeadDB(Context context) {
                super(context);
                mContext = context;
        }

        @Override
        public String getModelName() {
                return "crm.lead";
        }

        @Override
        public List<OEColumn> getModelColumns() {
                List<OEColumn> cols = new ArrayList<OEColumn>();

                cols.add(new OEColumn("name", "name", OEFields.varchar(64)));
                cols.add(new OEColumn("partner_id", "Customer", OEFields.manyToOne(new ResPartnerDB(mContext))));
                cols.add(new OEColumn("user_id", "Sales Person", OEFields.manyToOne(new ResUsers(mContext))));
                cols.add(new OEColumn("categ_ids", "Category", OEFields.manyToMany(new CRMCaseCateg(mContext))));
                cols.add(new OEColumn("description", "Description", OEFields.text()));

                return cols;
        }
        class ResUsers extends OEDatabase {

                public ResUsers(Context context) {
                        super(context);
                }

                @Override
                public String getModelName() {
                        return "res.users";
                }

                @Override
                public List<OEColumn> getModelColumns() {
                        List<OEColumn> cols = new ArrayList<OEColumn>();
                        cols.add(new OEColumn("name", "name", OEFields.varchar(64)));
                        return cols;
                }
        }
        class CRMCaseCateg extends OEDatabase {

                public CRMCaseCateg(Context context) {
                        super(context);
                }

                @Override
                public String getModelName() {
                        return "crm.case.categ";
                }

                @Override
                public List<OEColumn> getModelColumns() {
                        List<OEColumn> cols = new ArrayList<OEColumn>();
                        cols.add(new OEColumn("name", "name", OEFields.varchar(64)));
                        return cols;
                }
        }
}
Reference: Fields
Here, we have created two other classes inside LeadDB:
- ResUsers
- CRMCaseCateg
We required relation model to provide column relation. Here, ResPartnerDB is already in base database models but we required two other models for our relation in columns (many2many and many2one).
Now we are ready with our database structure for CRM Lead.
Lead.java
In this file, you need to inherit abstract BaseFragment which implements two methos:
- databaseHelper() - Returns LeadDB instance.
- drawerMenus() - Returns list of Drawer menu
Reference: Drawer Menu
Content of file:
package com.openerp.addons.crm;

import java.util.ArrayList;
import java.util.List;

import android.content.Context;
import android.os.Bundle;
import android.support.v4.app.Fragment;

import com.openerp.support.BaseFragment;
import com.openerp.util.drawer.DrawerItem;

public class Lead extends BaseFragment {

        public static final String TAG = Lead.class.getSimpleName();

        @Override
        public Object databaseHelper(Context context) {
                return new LeadDB(context);
        }

        @Override
        public List<DrawerItem> drawerMenus(Context context) {
                List<DrawerItem> menu = new ArrayList<DrawerItem>();

                menu.add(new DrawerItem(TAG, "Leads", true));
                menu.add(new DrawerItem(TAG, "Leads", 0, "#cc0000", object("all")));
                return menu;
        }

        private Fragment object(String value) {
                Lead lead = new Lead();
                Bundle bundle = new Bundle();
                bundle.putString("lead_value", value);
                lead.setArguments(bundle);
                return lead;

        }
}
LeadService.java
This file used to fetch data from server when user start sync service. It inherit OEService class which implement two methods:
- getService() - returns self object i.e.,
this - performSync() - called when user start sync.
Content of file:
package com.openerp.addons.crm.services;

import android.accounts.Account;
import android.app.Service;
import android.content.ContentProviderClient;
import android.content.Context;
import android.content.SyncResult;
import android.os.Bundle;

import com.openerp.support.service.OEService;

public class LeadService extends OEService {

        @Override
        public Service getService() {
                return this;
        }

        @Override
        public void performSync(Context context, Account account, Bundle extras,
                        String authority, ContentProviderClient provider,
                        SyncResult syncResult) {

        }

}
Here, performSync() method will called when user start sync. We just need to call our database model and start sync for our model.
public class LeadService extends OEService {

        @Override
        public Service getService() {
                return this;
        }

        @Override
        public void performSync(Context context, Account account, Bundle extras,
                        String authority, ContentProviderClient provider,
                        SyncResult syncResult) {
+               LeadDB lead = new LeadDB(context);
+               OEHelper oe = lead.getOEInstance();
+               if (oe != null) {
+                       if (oe.syncWithServer()) {
+                               // TODO: Sync finished
+                       }
+               }
        }

}
Now, add service entry into AndroidManifest.xml file:
Add service tag under <application> tag
<service
    android:name="com.openerp.addons.crm.services.LeadService"
    android:exported="true" >
</service>
We are ready with our service but; we need service provider and its syn-adapter xml file to display it under Android Accounts.
LeadProvider.java
This file provide authority and sync adapter to our sync service. It inherit OEContentProvider which implement two methods:
- authority() - returns provider authority string
- contentUri() - returns privider content uri string
Content of file:
package com.openerp.addons.crm.providers.lead;

import com.openerp.support.provider.OEContentProvider;

public class LeadProvider extends OEContentProvider {
    public static String CONTENTURI = "com.openerp.addons.crm.providers.lead.LeadProvider";

    public static String AUTHORITY = "com.openerp.addons.crm.providers.lead";

    @Override
    public String authority() {
            return AUTHORITY;
    }

    @Override
    public String contentUri() {
            return CONTENTURI;
    }

}
Content Provider is ready now, but we must link this provider with sync-adapter xml file.
Create new sync_crm_adapter.xml file under /res/xml/
<sync-adapter xmlns:android="http://schemas.android.com/apk/res/android"
    android:accountType="com.openerp.auth"
    android:contentAuthority="com.openerp.addons.crm.providers.lead"
    android:supportsUploading="true"
    android:userVisible="true" />
Here, we uses com.openerp.auth type for creating our custom OpenERP account under Android Accounts.
Now, we have to add this providers entry into AndroidManifest.xml file using <provider> tag.
+    <provider
+        android:name="com.openerp.addons.crm.providers.lead.LeadProvider"
+        android:authorities="com.openerp.addons.crm.providers.lead"
+        android:enabled="true"
+        android:exported="true"
+        android:label="Leads"
+        android:syncable="true" />

<service
    android:name="com.openerp.addons.crm.services.LeadService"
    android:exported="true" >
+        <intent-filter>
+            <action android:name="android.content.SyncAdapter" />
+        </intent-filter>

+        <meta-data
+            android:name="android.content.SyncAdapter"
+            android:resource="@xml/sync_crm_adapter" />
</service>
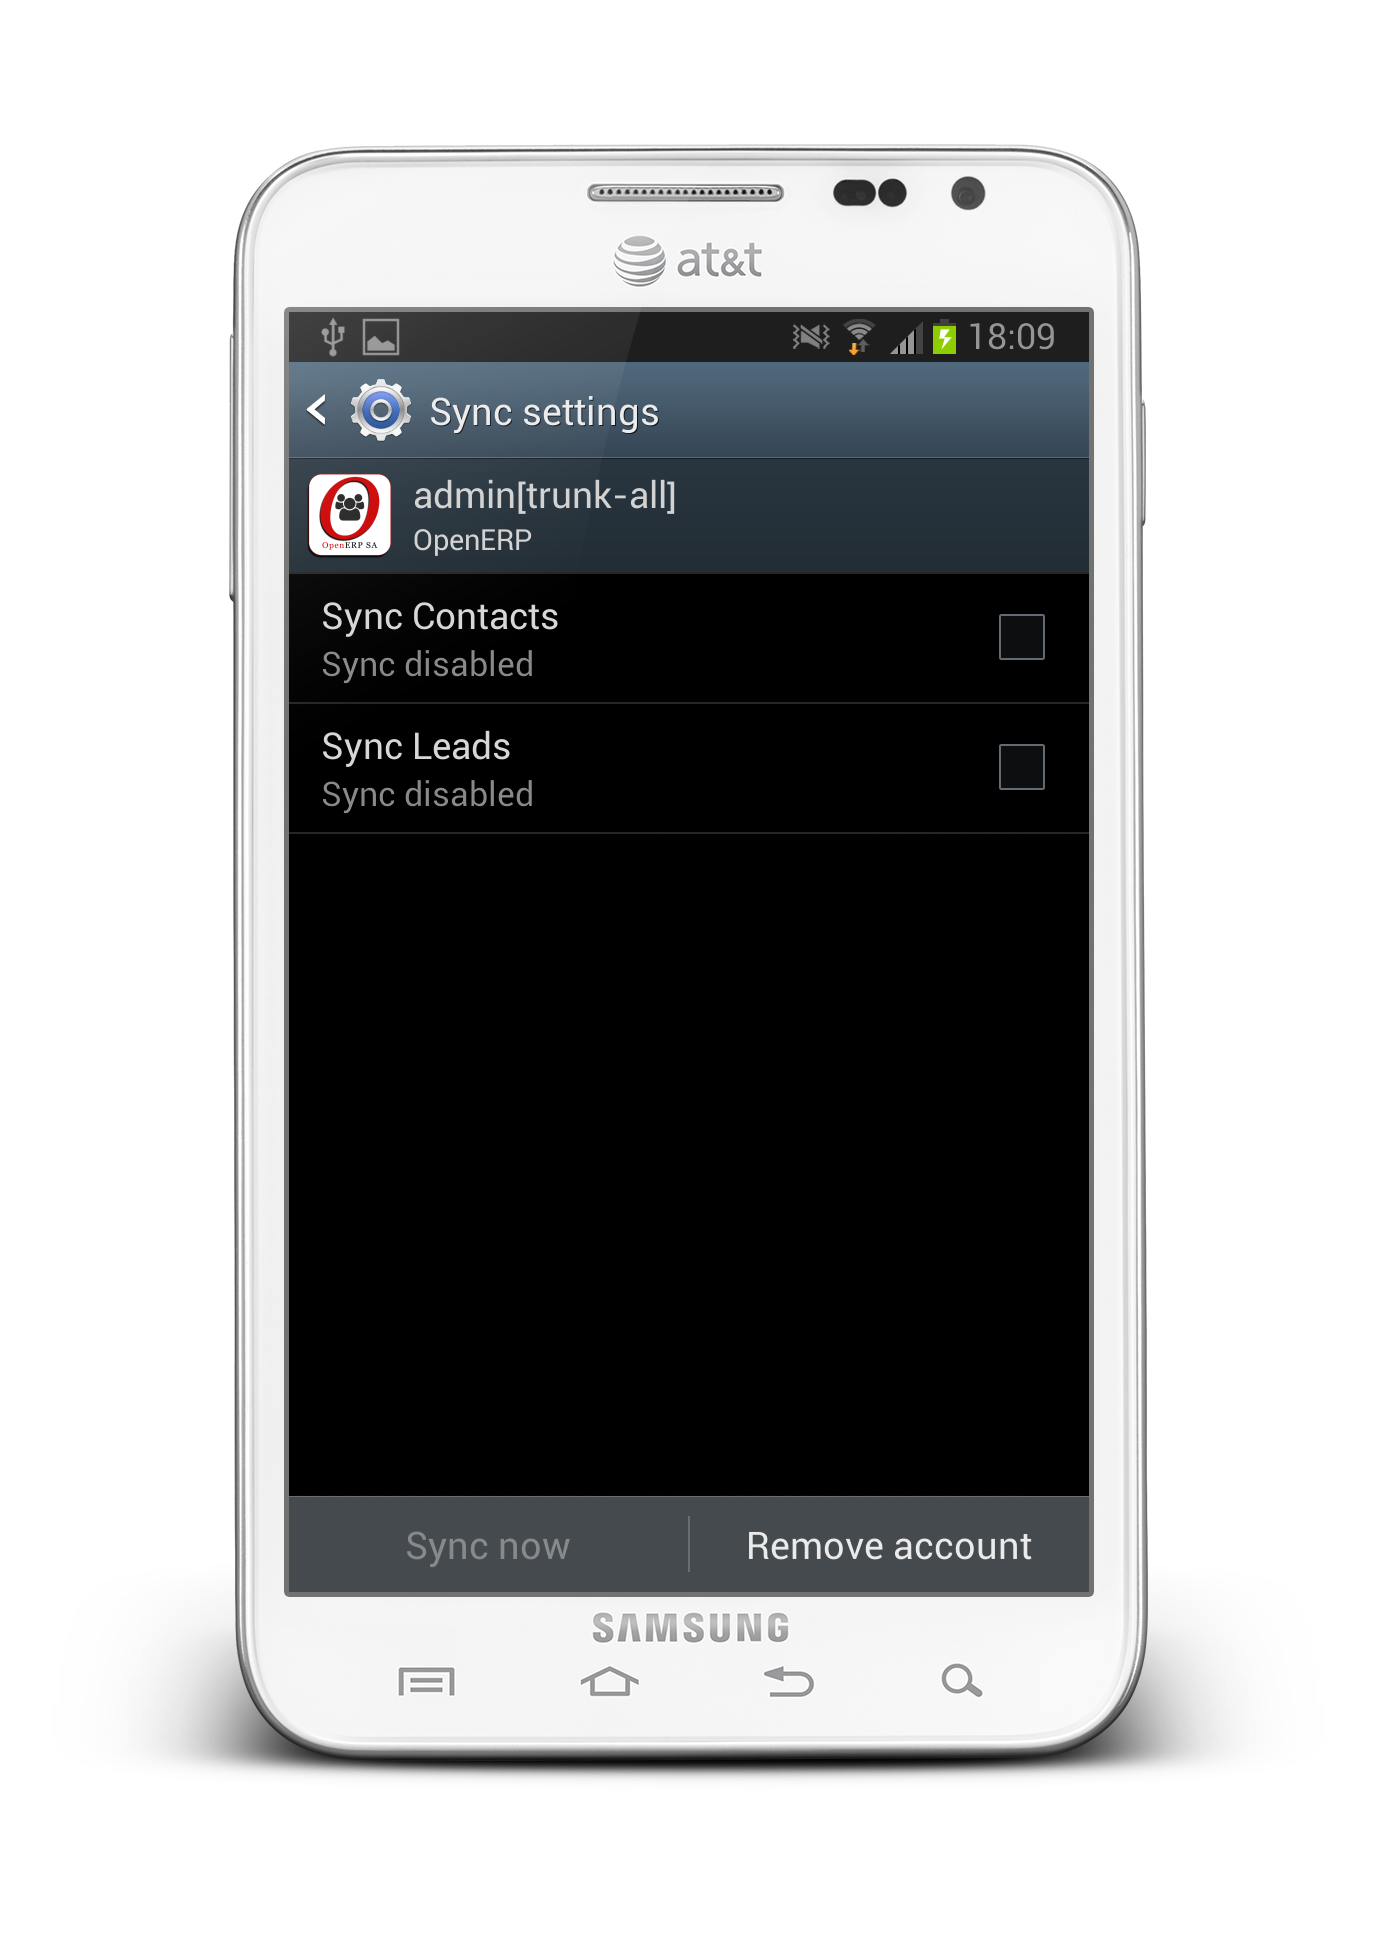
To test that sync service is added under Android account run your application and create account. You can find your sync service provider as below screenshot:
Now, We are ready with our core setup. Registering our module in ModuleConfig.java under com.openerp.config package.
package com.openerp.config;

import com.openerp.addons.crm.Lead;
import com.openerp.support.Module;
import com.openerp.support.ModulesConfigHelper;

public class ModulesConfig extends ModulesConfigHelper {

        public ModulesConfig() {
                add(new Module("module_crm", "CRM Lead", new Lead()), true);
        }
}
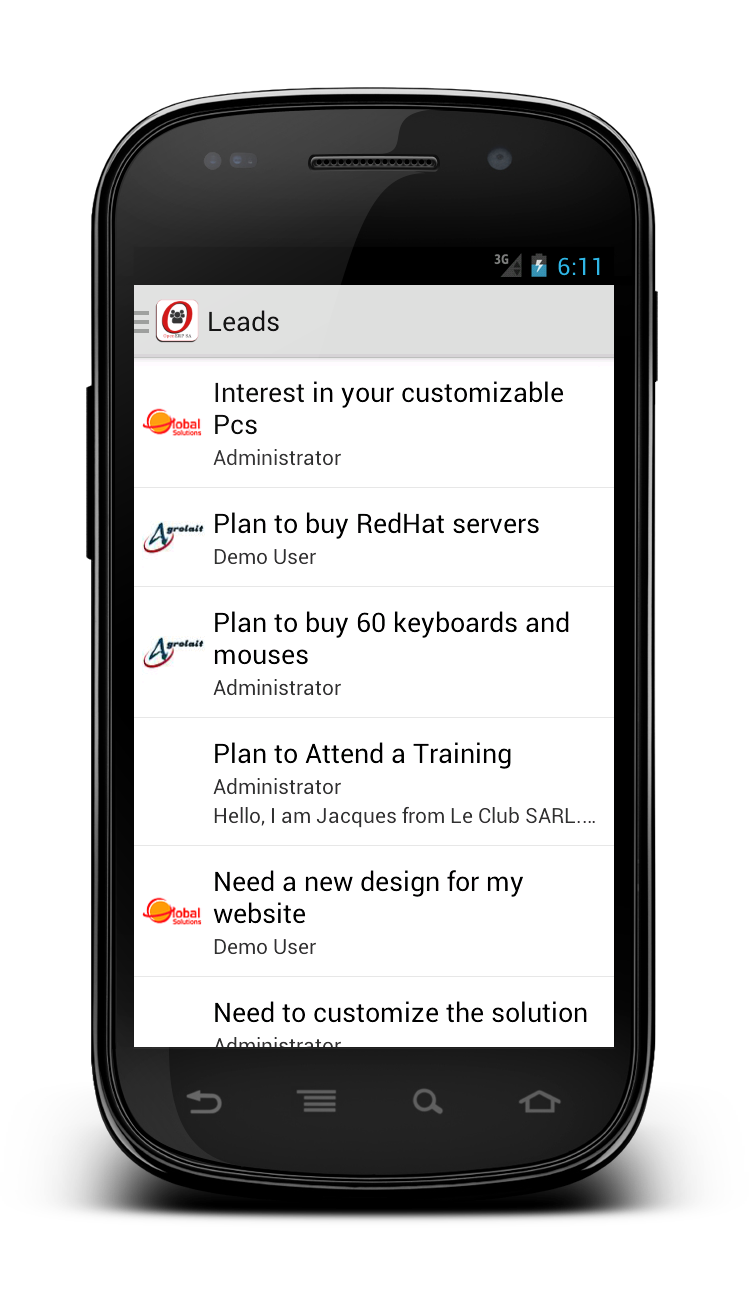
Now, First of all uninstall app from your device or emulator because it had created some base database tables. After unstalling run your application. It will show you your menu for CRM Lead as below screenshot:

Now, we create one crm_lead_layout.xml file for viewing all leads.
Create file under res/layout/
<LinearLayout xmlns:android="http://schemas.android.com/apk/res/android"
    android:layout_width="match_parent"
    android:layout_height="match_parent"
    android:orientation="vertical" >

    <ListView
        android:id="@+id/crmLeadListView"
        android:layout_width="match_parent"
        android:layout_height="match_parent"
        android:clipToPadding="false"
        android:paddingTop="?android:attr/actionBarSize" >
    </ListView>

</LinearLayout>
Also create one crm_lead_custom_row.xml that we will use for our ListView custom layout.
<LinearLayout xmlns:android="http://schemas.android.com/apk/res/android"
    android:layout_width="match_parent"
    android:layout_height="match_parent"
    android:orientation="horizontal"
    android:padding="5dp" >

    <ImageView
        android:id="@+id/imgCustomerPic"
        android:layout_width="42dp"
        android:layout_height="42dp"
        android:layout_gravity="center_vertical"
        android:src="@drawable/ic_launcher" />

    <LinearLayout
        android:layout_width="0dp"
        android:layout_height="match_parent"
        android:layout_weight="1"
        android:orientation="vertical"
        android:padding="5dp" >

        <TextView
            android:id="@+id/txvLeadName"
            android:layout_width="match_parent"
            android:layout_height="wrap_content"
            android:text="Lead Name"
            android:textAppearance="?android:attr/textAppearanceMedium" />

        <TextView
            android:id="@+id/txvLeadSalesPerson"
            android:layout_width="match_parent"
            android:layout_height="wrap_content"
            android:text="Sales Person Name"
            android:textAppearance="?android:attr/textAppearanceSmall" />

        <TextView
            android:id="@+id/txvLeadDescription"
            android:layout_width="match_parent"
            android:layout_height="wrap_content"
            android:ellipsize="end"
            android:singleLine="true"
            android:text="Lead Description"
            android:textAppearance="?android:attr/textAppearanceSmall" />
    </LinearLayout>

</LinearLayout>
We have created our Layout files. Now open Lead.java file and override onCreateView() method.
public class Lead extends BaseFragment {

        public static final String TAG = Lead.class.getSimpleName();

+       View mView = null;
+       ListView mListview = null;
+       OEListAdapter mListAdapter = null;
+       List<Object> mLeadItems = new ArrayList<Object>();

+       @Override
+       public View onCreateView(LayoutInflater inflater, ViewGroup container,
+                       Bundle savedInstanceState) {
+               mView = inflater.inflate(R.layout.crm_layout, container, false);
+               return mView;
+       }

    . . . . .
    . . . . .
Create init() method to for initiate objects.
public class Lead extends BaseFragment {

        public static final String TAG = Lead.class.getSimpleName();

        View mView = null;
        ListView mListview = null;
        OEListAdapter mListAdapter = null;
        List<Object> mLeadItems = new ArrayList<Object>();
+       LeadLoader mLeadLoader = null;

        @Override
        public View onCreateView(LayoutInflater inflater, ViewGroup container,
                        Bundle savedInstanceState) {
                scope = new AppScope(getActivity());
                mView = inflater.inflate(R.layout.crm_lead_layout, container, false);
+               init();
                return mView;
        }

+       private void init() {
+               mListview = (ListView) mView.findViewById(R.id.crmLeadListView);
+               mListAdapter = new OEListAdapter(getActivity(),
+                               R.layout.crm_lead_custom_row, mLeadItems) {
+                       @Override
+                       public View getView(int position, View convertView, ViewGroup parent) {
+                               View view = convertView;
+                               if (view == null)
+                                       view = getActivity().getLayoutInflater().inflate(getResource(),
+                                                       parent, false);
+                               return view;
+                       }
+               };
+               mListview.setAdapter(mListAdapter);
+               mLeadLoader = new LeadLoader();
+               mLeadLoader.execute();
+       }

+       private void checkStatus() {
+               if (db().isEmptyTable()) {
+                       scope.main().requestSync(LeadProvider.AUTHORITY);
+               }
+       }

+       class LeadLoader extends AsyncTask<Void, Void, Void> {
+
+               @Override
+               protected Void doInBackground(Void... params) {
+                       mLeadItems.clear();
+                       LeadDB db = new LeadDB(getActivity());
+                       mLeadItems.addAll(db.select());
+                       return null;
+               }
+
+               @Override
+               protected void onPostExecute(Void result) {
+                       mListAdapter.notifiyDataChange(mLeadItems);
+                       checkStatus();
+               }
+       }
Here, we have created asynchronous task LeadLoader for loading row from data table in background process. After finishing data loading we have checked for record availability. If we got empty table than system will start sync as written in checkStatus() method.
Now, we have to fill each data in our custom row of ListView as below code:
private void init() {
    mListview = (ListView) mView.findViewById(R.id.crmLeadListView);
    mListAdapter = new OEListAdapter(getActivity(),
                    R.layout.crm_lead_custom_row, mLeadItems) {
            @Override
            public View getView(int position, View convertView, ViewGroup parent) {
                    View view = convertView;
                    if (view == null)
                            view = getActivity().getLayoutInflater().inflate(getResource(),
                                            parent, false);

+                OEDataRow row = (OEDataRow) mLeadItems.get(position);

+                ImageView imgCustomerPic = (ImageView) view.findViewById(R.id.imgCustomerPic);
+                Bitmap bitmap = null;
+                OEDataRow partner = row.getM2ORecord("partner_id").browse();
+                if (partner != null) {
+                   String base64Image = partner.getString("image_small");
+                   bitmap = Base64Helper.getBitmapImage(getActivity(), base64Image);
+                }
+                imgCustomerPic.setImageBitmap(bitmap);

+                TextView txvName, txvSalesPerson, txvDescription;
+                txvName = (TextView) view.findViewById(R.id.txvLeadName);
+                txvSalesPerson = (TextView) view.findViewById(R.id.txvLeadSalesPerson);
+                txvDescription = (TextView) view.findViewById(R.id.txvLeadDescription);

+                txvName.setText(row.getString("name"));
+                OEDataRow user = row.getM2ORecord("user_id").browse();
+                String salesPerson = "";
+                if (user != null)
+                   salesPerson = user.getString("name");
+                txvSalesPerson.setText(salesPerson);

+                if(salesPerson.equals("false"))
+                   txvSalesPerson.setVisibility(View.GONE);

+                txvDescription.setText(row.getString("description"));
+                if(row.getString("description").equals("false"))
+                   txvDescription.setVisibility(View.GONE);
                    return view;
            }
    };
    mListview.setAdapter(mListAdapter);
}
Now we are ready with our app. But when there are no any data in data table app will start sync, on sync finish we have to reload listview.
For that we just register SyncFinishReceiver receiver in your fragment.
@Override
public void onResume() {
        super.onResume();
        getActivity().registerReceiver(mSyncFinish,
                        new IntentFilter(SyncFinishReceiver.SYNC_FINISH));
}

@Override
public void onPause() {
        super.onPause();
        getActivity().unregisterReceiver(mSyncFinish);
}

SyncFinishReceiver mSyncFinish = new SyncFinishReceiver() {
        public void onReceive(Context context, android.content.Intent intent) {
                mLeadLoader = new LeadLoader();
                mLeadLoader.execute();
        };
};
Broadcast Syncfinish intent from your LeadService when sync finished:
public class LeadService extends OEService {

        @Override
        public Service getService() {
                return this;
        }

        @Override
        public void performSync(Context context, Account account, Bundle extras,
                        String authority, ContentProviderClient provider,
                        SyncResult syncResult) {
                LeadDB lead = new LeadDB(context);
                OEHelper oe = lead.getOEInstance();
                if (oe != null) {
                        if (oe.syncWithServer()) {
-                               // TODO: Sync finished
+                               Intent intent = new Intent(SyncFinishReceiver.SYNC_FINISH);
+                               sendBroadcast(intent);
                        }
                }
        }

}
Now, Run your application. It will first sync lead from server and when sync finish. Receiver got call and your listview will be reloaded.